
We all want that aesthetically pleasing, orderly, convenient look to our clothing items in our drawers. The question is… how do we accomplish that? How do we fold our clothes to their smallest size without spending hours folding one shirt? Luckily, I’m here for you!! Here are some helpful tips and tricks to make your sloppy folding job turn into a work of art without spending an hour per laundry basket!
How do I decide what folding methods to apply to what items?
Generally speaking, the three most basic folding methods are either rolling, stacking, or “bunching and tossing.” Look at it like you would look at a recipe book. The laundry basket is all of your ingredients, and the directions are your methods. Here’s the recipe:
The Laundry Basket Secret Recipe:
Ingredients:
- Underwear
- Socks
- Shirts
- Pants
- Towels
- Sheets
Directions:
- For all of the underwear, use the stack tip or my rolling method (shown down below).
- For the socks, find their match and use the “bunch and toss” method.
- For the shirts (long and short-sleeved), use the stacking or rolling method (pick the one that you are best at and will be able to keep tidy later on).
- Pants? Yup! You guessed it! Stack or roll those too!!
- Towels, just like shirts and pants, should be stacked or rolled.
- Sheets should be folded using the stack method first, and then you can decide if you would like to roll them once they’re stacked.
Umm, okay! We have the recipe, but how do we stack, roll, or “bunch and toss”? Don’t stress, I got you covered!!
Folding Underwear and Socks:
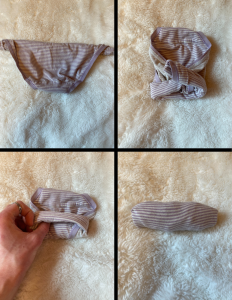
The underwear- For underwear, lay them flat in front of you with the wider side being closest to you face up. Next, take the two ends and roll the underwear down to about the midway point or just slightly further. Flip the underwear over and tuck the rolled ends in to create a rectangle. Lastly, roll the rectangle down until you see a distinct oval-donut shape and fold the further end of the donut into itself.
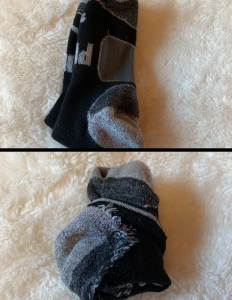
The socks- Find their buddy, and lay the one on top of the other with both of them facing the same direction. Take the open end of the top sock while holding the other sock and tuck them into each other.
Folding Shirts:
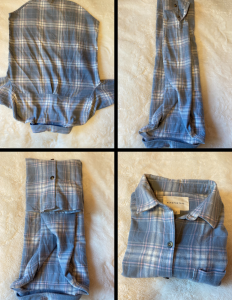
Long Sleeve- If the shirt has buttons or a zipper, make sure that your first step is buttoning all of the buttons or zipping up the zipper to start off strong. Begin by laying the shirt flat in front of you so that the front of the shirt faces down with the neckline end being closer to you. Make sure the sleeves and hemlines are all wrinkle-free and fanned out. Fold one side in towards the middle and flip the sleeve down so that it also folds in with the side of the shirt. Repeat for the other side. Next, take the end that is farther away from you and fold it towards the middle. Lastly (the best part in my opinion), take the neckline end (the side closest to you) and flip it upright on top of the folded-in bottom portion. There you have it! A perfectly crisp, clean, and folded shirt!

Short-Sleeve- If the shirt contains any buttons or zippers, button the buttons or zip the zippers before you start folding! Similar to the long-sleeve shirt, begin by laying it flat in front of you with the front part of the T-shirt facing down and the neckline is the side closest to you. Next, make sure your seam lines are properly smoothed and the shirt is wrinkle-free (I know this part seems tedious, but trust me! This step saves you AMPLE time you would have spent trying to make a wrinkled/folded shirt look better). Fold in each side until about the neckline, and flip the sleeves back outward to create an elongated rectangle. Take the bottom portion of the shirt and fold it towards you about halfway, and flip the neckline side right on top of it. Now you have your long sleeves and short sleeves all neat and pretty!!
Folding Pants:
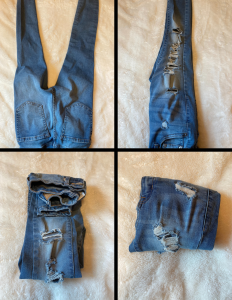
Pants- Just as you did with the shirts, make sure that if your pants have buttons or zippers, they are properly buttoned and zipped before beginning. Once you’ve passed the button/zipper checklist (or skipped it if it’s leggings that have no buttons or zippers), I normally give the pants a solid shake to allow them to straighten themselves out before laying them on my folding surface. After you give the pants a shake, lay them flat in front of you so that the waist side is closest to you with the front part facing down. Take one pant leg of your choice, and fold it directly on top of the other one (again, smoothing out the wrinkles as you go!). Then, take the side closest to you and fold it so that it matches up with the seam line of the ankle holes. Make sure to hold the folded ankle part, and then flip the half-folded pant legs onto the other side so that the waistline is (once again) in front of you. Lastly, take the waistline, and flip (just the seam line) away from you. Take the other end of the pant legs that are farther from you, and tuck that part into the waistline side you just flipped over. All done!! Now you have pants that will not unfold themselves when you go to put them away!
Shorts/Skirts- As in the name, the method of folding shorts (or skirts) is quite ‘short.’ Start, as always, by buttoning all the buttons and zipping all the zippers before beginning. Then, give them a good shake and lay them flat in front of you with the waistline side closest to you (and the front part facing down). Take one side, and fold it on top of the other. Lastly, fold the waistline down to meet the leg hole’s side. You should end up with a square/rectangular shape. If you did, then congrats! You successfully folded shorts!
Folding Towels:
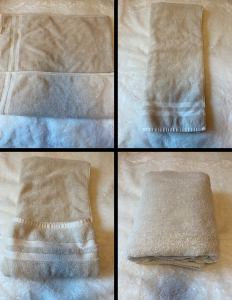
Towels are what we call “an easy fold” compared to the rest of the clothing items. Simply lay the towel (whatever the size) in front of you with the seam side facing you. Fold the side that is closest to you to the opposite end, and repeat once more. Then, flip the towel over so the embroidered edge side is face down. Pick a side, and fold it towards the middle. Then, using the same side you just folded in, fold it once more to meet the other end. There you have it! A tightly folded towel that looks hotel worthy!
Folding Sheets:
Sheets- Remember when you were a kid and would help fold a big blanket by taking a side, grasping the two corners of your side, and walking to meet the person across from you so that you could connect corners with them? If you missed out on this fun experience, you’ve come to the right place! To fold a plain, large sheet, make sure that you have enough room so that you can shake it out while grasping the two corners of the side you “chose.” You may have to stretch your arms out for this one if you don’t want the sheet to touch the floor. I fully recommend standing for folding these (or any sheet element, for that matter). After shaking the sheet out, reach down toward the ground and find the other side’s corners, being sure to grasp your first corners tightly throughout the process. Connect your side’s corners with the corners on the opposite side. Next, keep a firm grip on the opened side, and continue folding and meeting corners until the sheet becomes a bit smaller to manage. Once it’s small enough, lay it out on a flat surface. Follow the steps that you did to fold towels by folding one side towards the middle until you reach the other side. You should have an elongated rectangle that is vertical to you. Take the side closest to you, and begin folding it all the way to meet the other side by folding it in fractions. Yay!! You folded a wrinkle-free sheet!!
Pillowcases- Folding pillowcases are just like folding towels. Start by making sure your seam lines are straight and lay the pillowcase flat in front of you so that the open end of the pillowcase is closer to you vertically. Take the open end of the pillowcase, and fold it to meet the end of the pillowcase that is further from you. Next, turn the pillowcase counterclockwise once, and fold the end that is closer to you a third of the way, fold the third so that it’s two-thirds of the way to the other end, and then fold the two-thirds pillowcase so that it meets the other end at last. Turn it counterclockwise so that the open side (once again) is closer to you vertically. Fold the thicker part of the pillowcase inwards to start, and use that as your starter for beginning to keep folding the elongated rectangle all the way to meet the other end. Your result should be a tight, tiny rectangle.
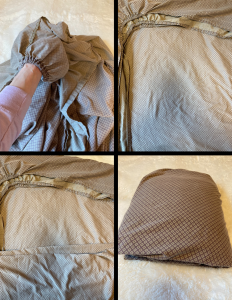
Fitted Sheets- Oh, we’ve come to every inexperienced folder’s nightmare: the fitted sheet. Raise a hand if you have been guilty of wadding those suckers up and putting them in the linen closet to hide them where they will go unseen…. ME! However, I promise, with practice, we can fix the big sheet wad. Begin by taking your fitted sheet into an area where you will have room to stretch out. With the upright side facing toward you and the seam line side facing away from you, stick your left hand in the left corner and your right into the right hand into the right corner. Meet the two corners together, folding one over the other. Using your right hand, hold what should be just one corner, and reach down towards the floor to grab the other two corners. Meet those two corners together as well, making sure that the entire seam line side of the sheet is tucked in so that none of it is sticking inside out. You should now have two corners (one in each hand). Surprise! Meet those two corners together and fold one corner on top of the other, sticking your hand in the little “pocket” it will create. Now that you’ve met all your corners, still holding them all with one hand, reach to grab the side that is adjacent to the pockets, pinch it, and allow as much to fold in as possible to create a semi-square shape. You can now lay the sheet on a flat surface. Fold the side closest to you in a third of the way in (just like the pillowcases), fold the third into two-thirds, and then fold the two-thirds to meet the other side that is farthest from you. Turn the long rectangle once, and fold the end closest to you in so that it creates a tiny rectangle within the long rectangle, and continue folding the little rectangle just as you did the first time until you reach the other side. The result should be a tight, little rectangular shape that matches that of the sheet. It will take some practice and time, but I promise that you will be a fitted sheet master by the third try!
Words of Wisdom from the Folding Teacher:
1. Starting strong is key! Seam Lines should always be straight before beginning to fold.
2. Practice and time bring perfection. You cannot expect to be born with the instinct of how to fold a fitted sheet.
3. Are you getting frustrated and think that folding is unnecessary? Just remember this:
if there is ANYTHING you can do to make your home look more organized and clean for free, it is to have all of your laundry look like something straight out of a magazine.
0 Comments